Friday, 22 August 2014

Action camera #3 - Basic software

In this section I'll introduce you to the software that will drive the camera.
I will not go into details, just show you it's layout and some basic functionality of the camera.
The software is writen in python and is structured in modules that represent the submenus of the device.
As you start up the camera, you'll have the following options and submenus (indented).
You can navigate through this with the Left & Right buttons, confirm selection with the Enter button and start recording with the capture button.
  1. Image capture
  2. Video recording
  3. Image settings
    • Scene
    • Resolution
    • Shutter speed
    • Aperture
    • ISO
    • White balance
    • Saturation & sharpness
    • Back
  4. Video settings
    • Resolution
    • FPS
    • White balance
  5. Device settings
    • Time & Date
    • Exif
    • Units
    • Wifi
    • GPS
    • Sensors
  6. Power off
First thing to do is create a new python file: sudo nano main.py, you can run this later with the: sudo python main.py command.

Action camera #2 - Hardware layout

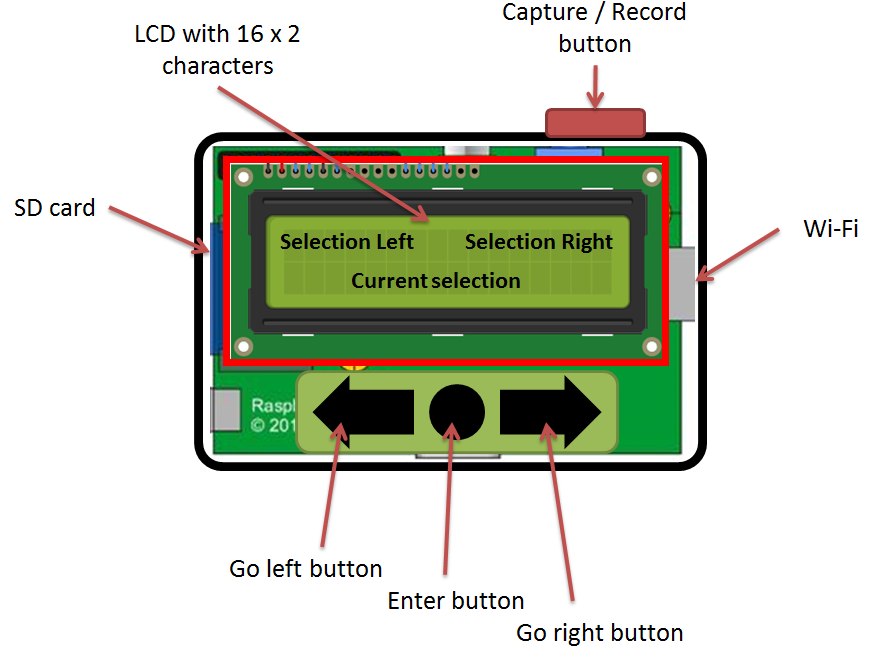
The layout of the camera I intend to be as compact as possible, without exceeding a creditcard size (the size of the Raspberry Pi) and all in one enclosure.
However it is possible that during the project I will chose a two module design, having the "brain" + controls, batery and display in one module and the camera + sensors in a different module, conected by a cord.
In this post I'll describe the initial one enclosure layout, that I target to have.
In the front (bottom of the Raspberry Pi) we will have the camera module, the GPS module, the temperature and pressure sensor and a battery pack.


In the back (top of the Raspberry Pi) we will  have a 16x2 monochrome LCD display and three buttons:
  1. Go left buttom: will make the "Selection Left" current
  2. Enter button: will confirm or execute "Current Selection"
  3. Go right button: will make the "Select Right" current
  4.  
 
On the sides we'll have the SD card acces slot, the Capture / Record button and the Wi-Fi module.

Saturday, 9 August 2014

Action camera #1 - Concept & Intro

In the following post series I'll write about my  new project, that is an action camera, powered by the Raspberry Pi mini computer. The final product should have similar features to the famous GoPro Hero action camera.
The brain of the gadget is a Raspberry Pi A, powered by a 700 Mhz processor with 256 MB of RAM. Should be powerful enough for 720p video and 5 MP image capture.
The "eye" will be the RaspiCam, a dedicated camera for the Raspberry Pi.

The controls will be from micro switches and it will use an 16x2 LCD for status display and configuration.

The software for the camera will be written in Python and will run on a simplified version of the Raspbian OS.

I don't have the full list of components required for this project at the moment, so in every stage I'll write the stuff that you'll need extra from the previous stage.
But for start:
- Raspberry Pi A or B
- 4GB or larger SD card
- RaspiCam
- Display with digital input (HDMI ori DVI-D)
- USB keyboard
- ~1A USB power supply.